

When we last wrote the article Connect BeLazy with other apps and services through Integromat, we did not yet have any templates available in Integromat, we had just released the BeLazy app. The good folks at Integromat have been very helpful, though, and enabled us to publish two templates that allow you to use the functionality with very little configuration. In this article, we explain how to set up these templates.
BeLazy and Google Sheets
Our first set up is an automation between BeLazy and Google Sheets and Google Drive. How does this automation work? Whenever a project is approved in BeLazy, it will enter into a Google Sheet and the attachments will be saved to Google Drive. If the attachment happens to be over 50 MB, you will get an email notification that states you should handle the attachment manually.
Of course, you need to prepare for this by
- Setting up Integromat,
- Configuring BeLazy, and
- Configuring Google Sheets and Google Drive.
- specify project languages, deadline, and service
- choose your translation vendor
Getting an API key from BeLazy
To start using BeLazy with Integromat, you need to activate the APIs. Here we give you some instructions on how to do so:
1. Create a new user or log in to BeLazy with your Google account (well, while technically you can use Microsoft, it makes sense to use Google if you want to use Google Sheets or Drive).
2. Click on the profile icon in the upper right corner, and select Api access tokens.
3. Click on Generate token, and then click on Copy token value under Actions.
4. Save this token, we’ll use it in Integromat soon.
Setting up Integromat and getting a webhook
Now you should create an account in Integromat. You can use the Google authentication, just like in BeLazy, and then it’s easier to manage everything with one set of credentials. Integromat has a free version, so don’t worry about extra costs!
When the Integromat app appears, click on Templates (the third icon on the left-side bar), then click on the funnel representing filtering, and from the list of apps, enter BeLazy. The two BeLazy templates will come up.

Now select the first one, and click on it, then click Create new scenario from template. The first step is going to be creating a webhook.
Click on Add next to the webhook field. A new box opens, now click on Add next to Connection. Paste the API key value that you got from BeLazy in the previous step. Click Save under Add a hook. At Step 1, you will receive a webhook address. Click Copy address to clipboard to save this address. We will have to go back to BeLazy now. Just to play safe, save this URL into a text file temporarily.
With a webhook, BeLazy will be able to notify Integromat that a project has been accepted, and Integromat will do its magic immediately.
Configuring the vendor portal and the BMS connections
In BeLazy, click the Add button under Connections. You need to enter the access details of a vendor portal or TMS, including URL, username, password, and the name of your connection. If you entered the right data, the connection will be automatable, and the Automate button appears next to the connection box.
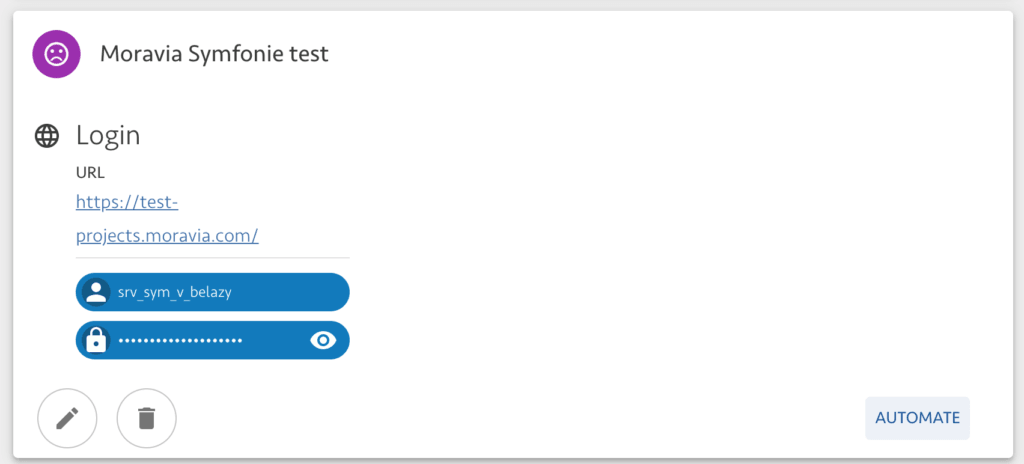
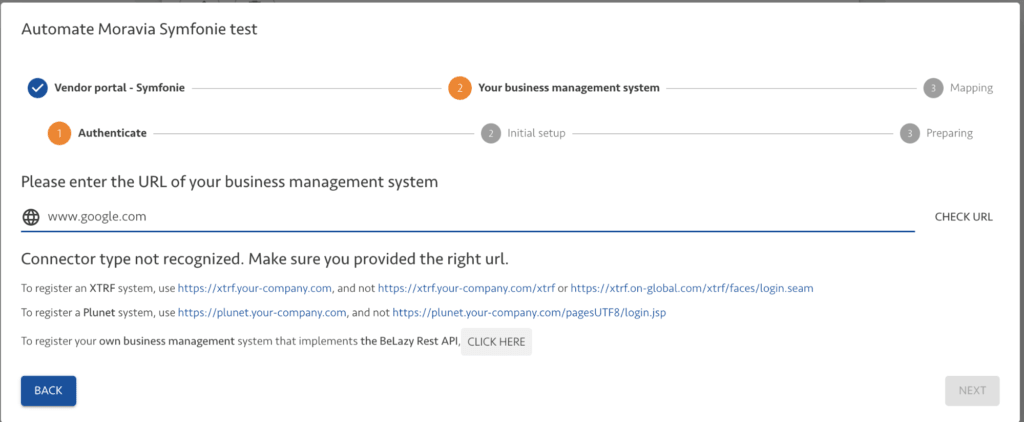
Click on the Automate button, and if BeLazy prompts you to, add further information about the connection (you’ll need to do it with Moravia Symfonie, as pictured above, you won’t need to do it with XTRF or Welocalize Junction). When you get to the page that says Please enter the URL of your business management system, just enter any random value, like www.google.com. BeLazy won’t find a working Plunet or XTRF instance, and will suggest that you configure this BMS. Click on Click here after To register your own business management system…, as shown on the picture.
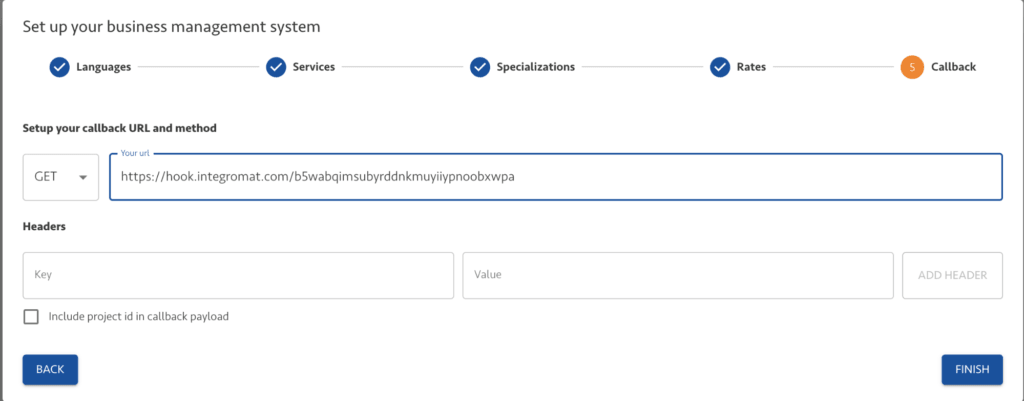
Now you need to click four times on Next, to go through all the metadata, without any configuration, but when you get to the Setup your callback URL and method, stop there. Copy the hook you received from Integromat (https://hook.integromat.com/….) into the Your url field in BeLazy. Click Next.
Continuing the Integromat configuration
Go back to Integromat. In Step 1, you had already filled in the webhook, so just click Continue. In Step 2, and many other steps, you only need to select the connection. Unfortunately, this needs to be done manually, but if you just started trying this, you will only have this one connection. Otherwise, make sure that you always select the same connection. I won’t be repeating this configuration requirement – at every step where there is Connection, select the right one. Now click Next.
In Step 3, where you have to select a Google Sheets connection, you need to enter or select your Google credentials. Give it a name (like Google account Your Name) and click Continue. The Google login screen comes up, and log in via Google.
Now you need to specify the spreadsheet from your Google account that you will use. We don’t have one yet. Well, Integromat won’t create you one, but in Google Sheets, just create a new, blank spreadsheet without entering any information, just a name. You can click on the little icon next to the Spreadsheet to update the values, so your newly connected spreadsheet will appear on the list. If you’re a master of IT, you can customize what goes where. If you are not, just click on Continue.
In Step 4, you need to select your Google connection again, and you need to select a folder where Integromat should save all your attachment files by clicking on Click here to select folder. You can customize the folder naming rule, but if you are okay with the default, just click Continue.
Now for the rest, until you reach Step 10, just select the right connection, and click Continue. Step 10 allows you to send an email using your Gmail account. If you have not given enough permissions, Integromat will extend it. Click Add a recipient in the To: field, and enter the email address of the person who should learn when an attachment was too big and wasn’t downloaded. Click Continue.
For the final step, just check the connection and click Continue. The scenario is ready to go.
Testing the scenario
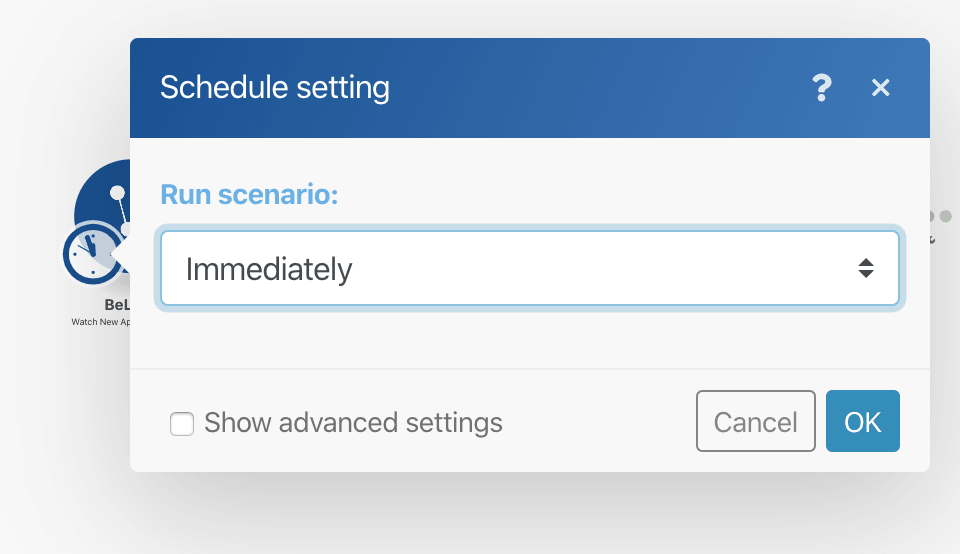
Click Run once. Integromat now shows that it is waiting for some action. Let’s give it some action.
Go back to BeLazy, and approve a project by clicking on the little check mark icon next to it in the list of Approvals pending. Now quickly go back to Integromat, and you’ll see the execution.
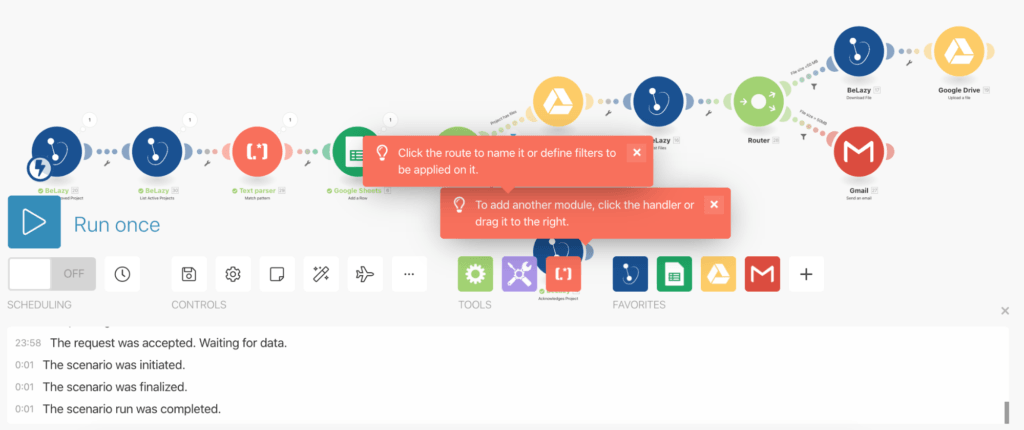
Time to look into the Google Sheet! It got a new line. You can edit the scope and order of data in the Google Sheets step in Integromat (and maybe it’s time to add a header). And Google Drive? If the project has an attachment, there will be a new folder with some file(s).
Activating the scenario

How about the other scenario?
Now that you have configured this scenario and works, you can also go back to Templates, filter for BeLazy, and create a scenario from the other template. It’s about automatically synchronizing the connections when a certain type of email comes in. For example, you receive an email from Lionbridge, and you want to quickly get the project. You can set up an email filter, and BeLazy will be called automatically. How? We are sure you can work out this simpler template yourself! If you are stuck, get in touch with us.